Sunday, February 28, 2010

Mounds style coconut cream pie!

I made this pie for a get together the other night and it was a hit!
It is so easy to make and a perfect light desert! 

what you need

2 squares BAKER'S Semi-Sweet Chocolate, chopped
2 cups  thawed COOL WHIP Whipped Topping, divided
3/4 cup BAKER'S ANGEL FLAKE Coconut, toasted, divided
1   HONEY MAID Graham Pie Crust (6 oz.)
1-1/2 cups cold milk
1 pkg.  (4-serving size) JELL-O Coconut Cream Flavor Instant Pudding 
*You can Also Make this Low Calorie by using fat free cool whip, milk and pudding * I also used extra coconut

Make It


MICROWAVE chocolate in medium microwaveable bowl on HIGH 1 min., stirring after 30 sec. Stir until chocolate is completely melted. Add 1 cup of the whipped topping and 1/4 cup of the coconut; stir until well blended. Spread onto bottom of crust. Refrigerate while preparing the filling.
POUR milk into large bowl. Add dry pudding mix. Beat with wire whisk 2 min. or until well blended. Spoon into crust. Top with the remaining 1 cup whipped topping and remaining 1/2 cup coconut.
REFRIGERATE 4 hours or until ready to serve. Store leftover pie in refrigerator.

Wednesday, February 24, 2010

Decorating Made Easy and FUN!!!

If you are anything like me and LOVE to decorate and redecorate your home I have found the cutest blogs. They give you so many fun ideas and for CHEAP too! Can't beat cheap. Anyway, check it out Here and Here!
Happy Decorating!!!
xoxo

Tuesday, February 23, 2010

Tissue Paper Art

I found this great idea on homeadebyjill.blogspot.com.(Thanks Alysha) This is such a fun and inexpensive way to create custom artwork for your home!
Tissue Paper ART


  So first, gather your supplies. I think this would also work well with pretty wrapping or scrapbook paper, but tissue paper works especially well because it is so thin. If you don't have any canvases to cover, you could cover a thin piece of cardboard and put it in a frame. You'll also need Mod Podge, a paintbrush, and a picture hanger if you are using a canvas.
  • Cut the tissue paper to the size of the canvas, leaving about 2 inches to wrap around each side.
  • Apply a thin coat of Mod Podge to the front of the canvas.
  • Carefully lay the tissue paper on top of the canvas. Working from one corner, press the tissue to the canvas, smoothing out any wrinkles and bubbles. You can pull the tissue up if you make a mistake, but be gentle because it is so delicate, especially when wet.
  • Apply Mod Podge to the sides of the canvas and wrap the tissue paper around it, as you would wrap a present. Set aside to dry.
  • When the front and sides are dry, flip the canvas over. Apply more glue to the back of the canvas and press the tissue paper to secure. I added a top coat of Mod Podge over the back edges to make sure they would not come up.
  • Add a picture hanger and find a the perfect spot to display your new, one-of-a-kind artwork.

Monday, February 22, 2010

A little inspiration...

Well, spring is right around the corner which also means spring cleaning is. If your anything like us you have tons of old electronics, old cell phones, dvd's etc. laying around and I just found a website www.gazelle.com that will buy your old electronics from you and they even send you a shipping label to get rid of it for free. Thought this would help inspire you all to get rid of these items in an environmentally conscious way that puts some extra cash in your wallet

Yummy Pizza Dough

The next time you want to make pizza, you can make it super easy and yummy. When you are at the grocery store ask the bakery department for pizza dough. They may not have it pizza dough but french bread dough works really well too, it is really inexpensive too (my grocery store sells it for 88 cents)! You want to make sure to roll the dough out and bake at 350-400 for 8 mins. Then put whatever toppings you want and bake till the cheese is melted.

A Great Frozen Find

I Love it when I find something frozen that well doesn't taste frozen! Barefoot Contessa (Ina Garden) from food network just launched a line of frozen, prepare in skillet meals. Being busy with the baby I picked one up (Chicken Fried Rice) and thought I'd give it a try for a dinner. We were both pleasantly surprised that it was soooo good! We cooked it a little extra so some of the rice was a little crispy and it was extra yummy! Just wanted to share this find, we will definitely try some of her other ones as well, and she does have meat free options for the vegetarians out there.

Sunday, February 21, 2010

Tofu and Vegetable Lettuce Wraps

I just made the best lettuce wraps!! It was pretty easy, and super yummy :) Here's how it goes:
1 pound firm tofu
1 Cucumber
1 zucchini
1 cup bean sprouts
1 head of butter lettuce (living lettuce)
1 bundle of cilantro
1/2 cup of chopped carrots
1 can water chestnuts- you can get them in the Asian section at the grocery store
Garlic
Ginger root
Soy Sauce
Sesame oil
Salt
Pepper

Preheat oven to 375. Cut the tofu into small cubes and place on a lightly oiled cookie sheet. In a bowl, mix some soy sauce and sesame oil, then pour it over the tofu making sure to cover every piece. Bake for about 30 minutes, or until the tofu is crispy on the outside, and moist on the inside. While the tofu is baking, cut up the carrots, zucchini, water chestnuts and cucumber into small pieces, and chop up the cilantro. I also made some brown rice with mine, and you can just cook that as directed on the box, probably takes about 20 minutes. When the tofu is close to being done, put the bean sprouts, water chestnuts, zucchini, carrots, garlic (depending on taste), ginger (just a pinch), cilantro and salt and pepper into a pan with some peanut oil in it and cook for a few minutes. Add a few tablespoons of soy sauce, and when the tofu is done baking, add it to the pan. Add the water chestnuts, and cook until everything its nice and hot. Cut off some leaves of the butter lettuce, rinse, fill with the tofu and vegetable mixture, top it off with some cold cucumbers, and ENJOY!!! Sooo yummy! Here are some pictures of the process :)


Saturday, February 20, 2010

Searching....

We loove pasta and want to be a little healthier by using whole wheat but I can't seem to find one that tastes similar to regular. Does anyone have any recommendations??

Ahhhmazing! Brownie Cups!


Ok I'll admit I am obsessed with Bakerella's recipes and found this one and it is to die for! These are so yummy and such an easy recipe!

Brownie Candy Cups

1 package Duncan Hines Chocolate Lovers Double Fudge Brownie Mix
2 eggs
1/3 cup water
1/4 cup vegetable oil
30 mini Reeses cups unwrapped
1 Box Reynolds 2-inch aluminum foil mini cups for muffins
(Much cuter as mini's but if you can't find the mini cups and muffin wrappers then you can also use the normal size of both and just adjust the cook time to 15 minutes, insert the peanut butter cups, and cook for 5 more.)

1. Preheat oven to 350
2. Place 30 foil liners on baking sheet
3. Combine brownie mix, contents from fudge packet in mix, eggs, water and oil.
4. Stir with spoon until well blended. (about 50 strokes)
5. Fill each liner with 2 tablespoons of batter
6. Bake at 350 for 10 minutes and remove from oven
7. Push 1 Reeses in center of each “brownie cupcake” until even with surface of the batter.
8. Bake 5-7 minutes longer.
9. Cool 5-10 minutes in pan and then move to cooling rack to cool completely.

Wednesday, February 10, 2010

Cake Ball Truffles

After heading over to bakerella.com (amazing site, thanks Trisha!) I got inspired to try making her cake ball truffles for valentines day. I invited 3 girlfriends over and we did a pretty good job, plus of course it was nice just catching up! Her recipe called for red velvet cake mix, which I couldn't find anywhere, so we used dark chocolate and cherry cake mix. The dark chocolate truffles with dark chocolate coating are to die for! the cherry were just ok. This is such a super easy gift to make, I bought little treat boxes and mini cupcake wrappers to place the cupcakes in and it is the perfect presentation for a sweet little handmade gift. Have fun and Happy baking!
Cake Ball Truffles
1 box dark chocolate cake mix (cook as directed on box for 13 X 9 cake)
1 can cream cheese frosting (16 oz.)
1 package chocolate (Bakers dark, semisweet or white; found in the baking aisle)
wax paper

1. After cake is cooked and cooled completely, crumble into large bowl.
2. Mix thoroughly with 1 can cream cheese frosting. (It may be easier to use fingers to mix together, but be warned it will get messy.)
3. Roll mixture into quarter size balls and lay on cookie sheet. (Should make 45-50. You can get even more if you use a mini ice cream scooper, but I like to hand roll them.)
4. Chill for several hours. (You can speed this up by putting in the freezer.)
5. Melt chocolate in microwave per directions on package.
6. Roll balls in chocolate and lay on wax paper until firm. (Use a spoon to dip and roll in chocolate and then tap off extra.)
7. Refridgerate then enjoy!
I also only melt a few pieces of chocolate bark at a time because it starts to cool and thicken. It’s easier to work with when it’s hot.


Monday, February 8, 2010

Fast, Easy, and Oh So Yummy!

I just made a quick and delicious dinner, so I thought I would share! I didn't take a picture of it though :( So this is what you'll need: (I bought everything at Trader Joes)
1 Package Cheese Tortellini
1 box of Trader Joes organic tomato & roasted red pepper soup
1 zucchini

I used a pot for each ingredient, and just cooked everything as directed. When everything is cooked, drain the tortellini, and zucchini then put it all together in a bowl. Its almost like 1/2 pasta, 1/2 soup! So Yummy!

Thursday, February 4, 2010

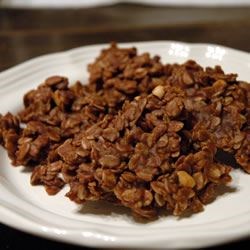
EASY No Bake Cookies by Mandy


These are my absolute favorite cookies! My mom used to make them, so when ever I feel homesick, I like to make these easy, and yummy cookies.


Ingredients

* 1 3/4 cups white sugar
* 1/2 cup milk
* 1/2 cup butter
* 4 tablespoons unsweetened cocoa powder
* 1/2 cup peanut butter
* 3 cups quick-cooking oats
* 1 teaspoon vanilla extract

Directions

1. In a medium saucepan, combine sugar, milk, butter, and cocoa. Bring to a boil, and cook for 1 1/2 minutes. Remove from heat, and stir in peanut butter, oats, and vanilla. Drop by teaspoonfuls onto wax paper. Let cool until hardened.

***Start timing when mixture reaches a full rolling boil; this is the trick to successful cookies. If you boil too long the cookies will be dry and crumbly. If you don't boil long enough, the cookies won't form properly.

Enjoy :)

A Super Bowl Snack

Well its Superbowl weekend so I thought Id post a good snack to make for your company or to bring to a party. It is easy to make and the crowd will love it. Most of all it will give us a nice healthy escape from all of the other guilty pleasures superbowl brings! :) My mom made this for my baby shower and I loved it! Yummy!


Veggie Pizza Served Chilled
1 or 2 Pillsbury® Crescent Recipe Creations® refrigerated seamless dough sheet (depends how big you make it)
1 or 2 packages cream cheese
1 or 2 packages Ranch dressing mix
Broccoli
Carrots
Cauliflower
Green, red or yellow bell peppers
Cucumber
Feel free to add Any veggie you like. About a half a cup of each veggie will do.

Roll out dough onto a cookie sheet, be sure to grease sheet if needed. Bake @ 375-for 13-17mins or until golden brown.(If dough is puffing up during baking poke with a toothpick to keep it flat)
let cool –
mix ranch mix with cream cheese – spread onto crust,
Top ranch with chopped veggies and refrigerate for at least one hour.
Cut and Enjoy! (use a football cookie cutter for superbowl or just cut in rectangles)
Have a fun and safe superbowl!

Wednesday, February 3, 2010

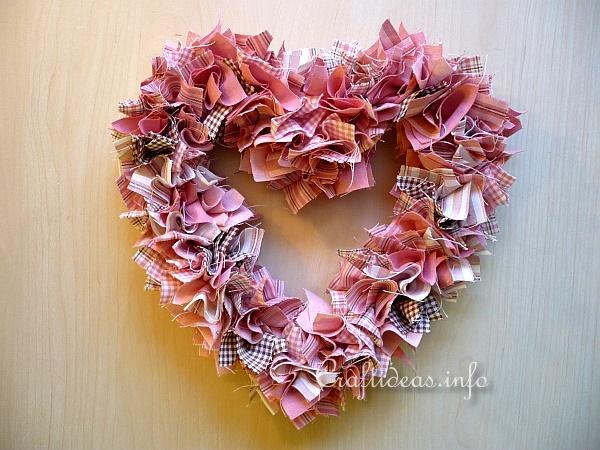
Fabric Heart Wreath

I Found this craft idea online, I'm going to give it a try this week. Cute shabby chic easy craft to hang on the door for Valentines Day. I'll let you know how mine turns out, and if you decide to make one post a picture!

Fabric Heart Wreath

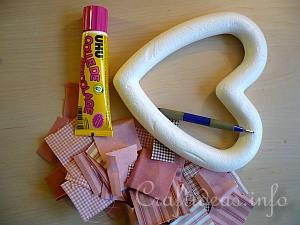
For this project you will need:

- strofoam heart
- several 5x5 cm squares of assorted fabrics that
compliment each other
- embossing tool
- craft glue

Fabric Heart Wreath Supplies

Instructions:

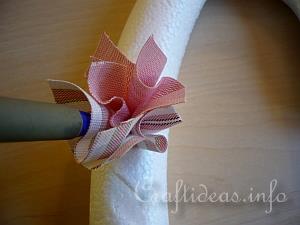
1. Cut out an assortment of fabric squares each measuring 5 x 5 cm and proceed by taking the first piece and placing it over the wreath. Use the stylus and insert it in the center of the fabric and poke the fabric into the wreath. The styrofoam will normally hold the fabric without glue but you may rub on a thin coat of glue on the surface of the wreath if you like.

Fabric Heart Wreath Detail

2. Continue adding new scrap pieces close to the previously added piece and continue in the same manner as step one until the entire front, inside and outside of the wreath is full. If you missed a section, you can always add more scraps afterwards.

Semi-Homeade Cupids Cupcakes

A Fun SUPER easy tasty treat to make for Valentines Day
Cherry Vanilla Coconut Cupcakes!

1 box of French Vanilla Cake Mix
1 container Cherry Frosting
1 Bag sweetened coconut flakes
1/2 Tsp. Vanilla extract

Follow cake mix directions on box, add vanilla and 3/4 cup of coconut. Bake. Let Cool. Frost and top with coconut and pink sugar crystals if desired.
This was a super easy, practically Betty Crocker made recipe but with the little kick of vanilla and coconut they tasted like I was in the kitchen all day! Jeff tasted and approves! A fun treat to have around the house for Valentines day!

Welcome!

Hello Everyone! I decided to Host a blog that we can all post on and share ideas, home improvements, crafty things, yummy recipes and fun activities. Pretty much it is an idea board to share with everyone else. Post and share your favorite recipes, any current crafts you are working on or a fun weekend project that you think others might be interested in trying out! Please have fun with your posts and I look forward to seeing all of your ideas and sharing a few of my own! Thanks!